

Saturday morning, the referee is checking studs while a U9 midfielder wrestles with a twisted sock and a shin guard that has slipped towards the ankle. The player is ready to play, but the equipment isn't. On a real touchline, that small delay usually comes from one of three problems: the guard is the wrong size, it isn't centred, or the sock and fastening system aren't holding it in place.
Learning how to wear soccer shin guards properly isn't just about avoiding a telling-off before kick-off. The right position helps the guard cover the front of the tibia, stay stable during running and tackling, and meet the equipment requirements used in organised football. The method below follows The FA's Law 4 guidance while adding the practical fitting checks that make sense for players from youth football through to adults.
Why Shin Guards Matter Before Kickoff
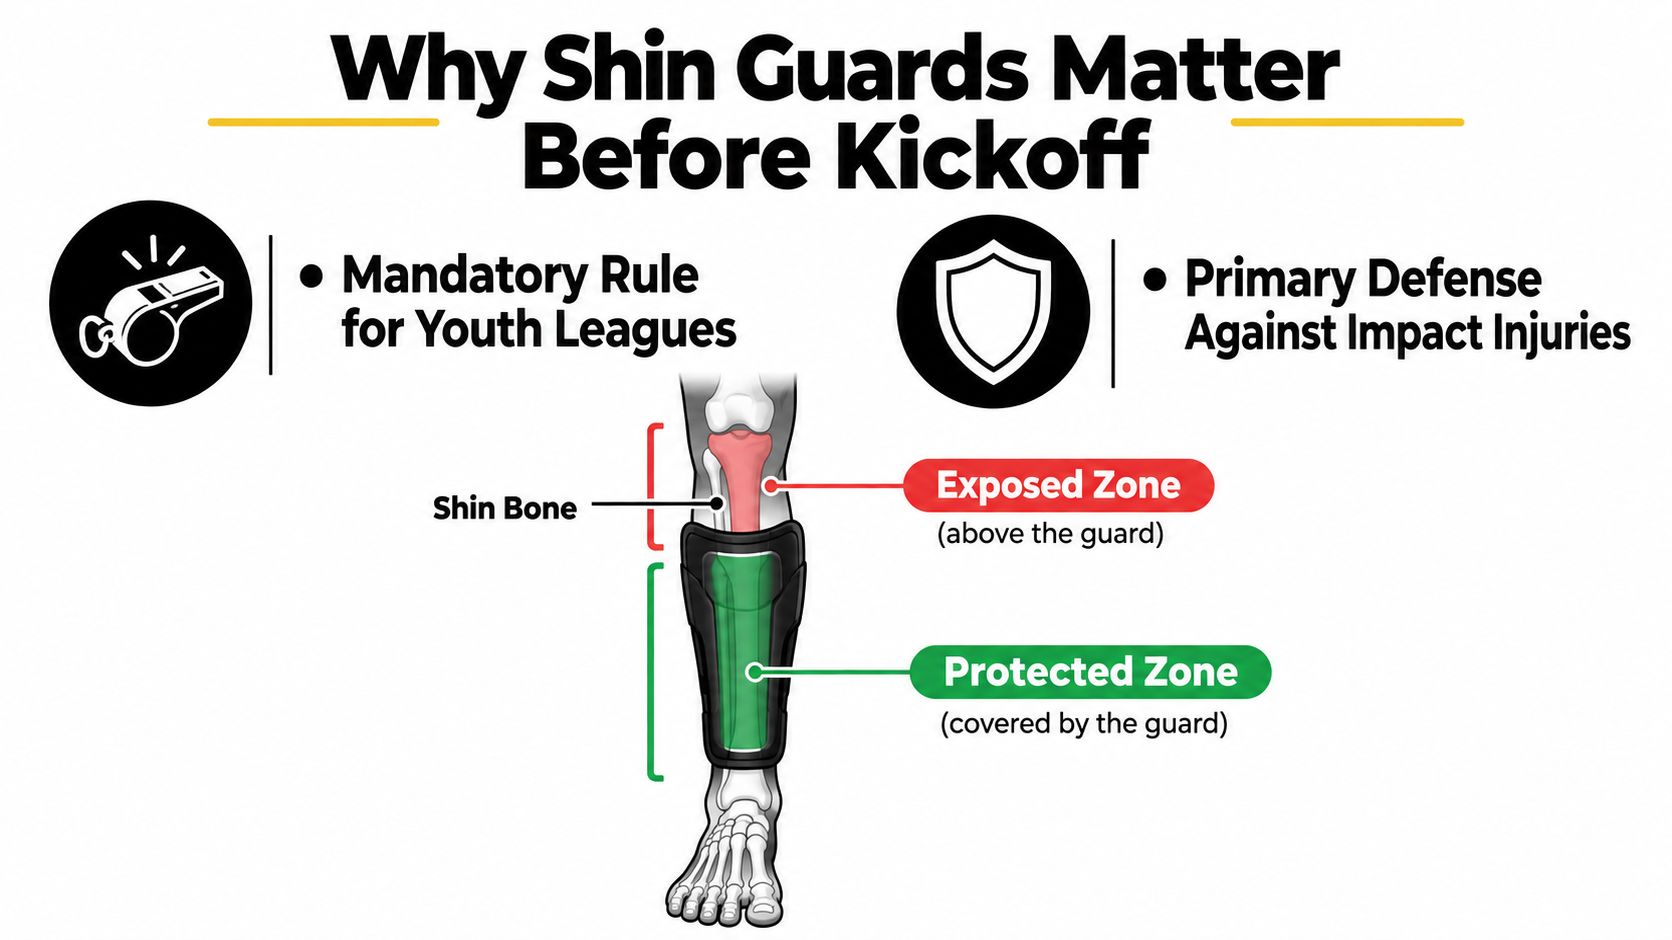
Under Law 4, shin guards are compulsory equipment in England. The Football Association says they must be made from a suitable material, provide a reasonable degree of protection, be an appropriate size, and be covered entirely by the socks. The FA's official Law 4 player equipment guidance also places responsibility on the player to wear suitable equipment.
That matters before anyone thinks about style. A guard sitting visibly above the sock line isn't being worn correctly, and a lost guard must be replaced as soon as possible, no later than the next stoppage when the ball goes out of play. In grassroots football, the referee can require a player to correct the issue before returning to the pitch.
What the guard can and cannot do
A shin guard spreads and absorbs some force from kicks, tackles, studs and accidental collisions. It protects the vulnerable front edge of the lower leg, but it doesn't make the tibia invulnerable, prevent every bruise, or remove the risk of ankle and knee injuries. The published study of tibial shaft fractures recorded 244 fractures, including 24 football-related cases, or 9.8%, with shin guards worn in 95.8% of those football-related cases, as reported in the PubMed study on football-related tibial fractures. That evidence supports secure protective equipment, not a promise that injuries cannot happen.
The practical choice usually falls between taped or basic guards, moulded shells, and carbon-reinforced designs. Taped or simple slip-in guards are light and flexible but depend heavily on a sleeve or tape. Moulded shells offer a more structured barrier, while carbon-reinforced products can prioritise impact resistance at the expense of some flexibility and price. A costly boot still doesn't protect the exposed shin. The guard is the part of the kit placed directly over the bone.
For broader preparation, it also helps to understand how equipment fits into a complete approach to prevent sports injuries with smart recovery. You can also compare related protective equipment in this SoccerWares injury prevention equipment guide. Before fitting, inspect the shell, backing and fasteners. Technique only works when the guard itself is intact and suitable.
Choosing the Right Type for Your Position
The right style depends less on a player's position than on their age, tolerance for movement and need for ankle coverage. A winger who wants maximum ankle freedom will usually choose differently from a young player who needs a guard that stays put through constant stop-start movement.
Three styles seen on the touchline
Slip-in guards are hard shells designed to sit under the sock, usually held in place by a compression sleeve, grippy sock or tape. They're lightweight and have a low profile, which suits older youth players and adults who want unrestricted ankle movement for passing, turning and dribbling. Their weakness is movement. Without a reliable holding layer, they can rotate towards the calf or slide down during a match.
Ankle sleeve guards combine a shin shell with fabric and padding around the ankle bones. They're the sensible default for many U7 to U11 players because the design gives extra coverage around the malleolus and often includes a stirrup that helps prevent the guard shifting. The trade-off is bulk. Some children find the ankle padding uncomfortable inside the boot, particularly if the boot already has a narrow fit.
Strapped guards use elastic, Velcro or similar fasteners around the leg. They're straightforward to fit, which is why they remain common in lower grassroots football. They can feel secure when adjusted well, but straps may rub, loosen or dig into the calf if tension is wrong.
| Shin Guard Types At a Glance | Protection | Comfort | Best For |
|---|---|---|---|
| Slip-in | Front-of-shin coverage, with stability dependent on the sleeve or tape | Light and flexible | Older youth and adult technical players |
| Ankle sleeve | Shin coverage plus added ankle protection | More padded and bulky | Younger players who need extra joint cover |
| Strapped | Secure shell positioning when straps are adjusted correctly | Easy to fit, but straps can rub | Grassroots players who prefer simple fastening |
Coach's view: Upgrade when the current guard moves, leaves a meaningful part of the shin uncovered, or no longer suits the player's ankle and boot fit.
For a more detailed buying comparison, use this guide to finding the best shin guards for soccer. Once you choose the style, keep its fastening method in mind. A slip-in guard needs a different sequence from a strapped or ankle-sleeve model.
Sizing and Measuring for a Proper Fit
A child's shoe size won't tell you whether a shin guard is long enough. Youth sizing commonly follows the player's height band and the manufacturer's chart, while the more reliable physical check is the length of the shin itself.
Measure the leg at home
Seat the player on a bench and bend the knee to 90 degrees. Starting roughly two finger-widths below the kneecap, measure down the front of the leg to the top of the ankle bone. Keep the tape over the shin rather than drifting onto the calf, then compare the result with the brand's size chart. The SoccerWares shin guard size chart is useful for checking the manufacturer's stated fit before ordering.
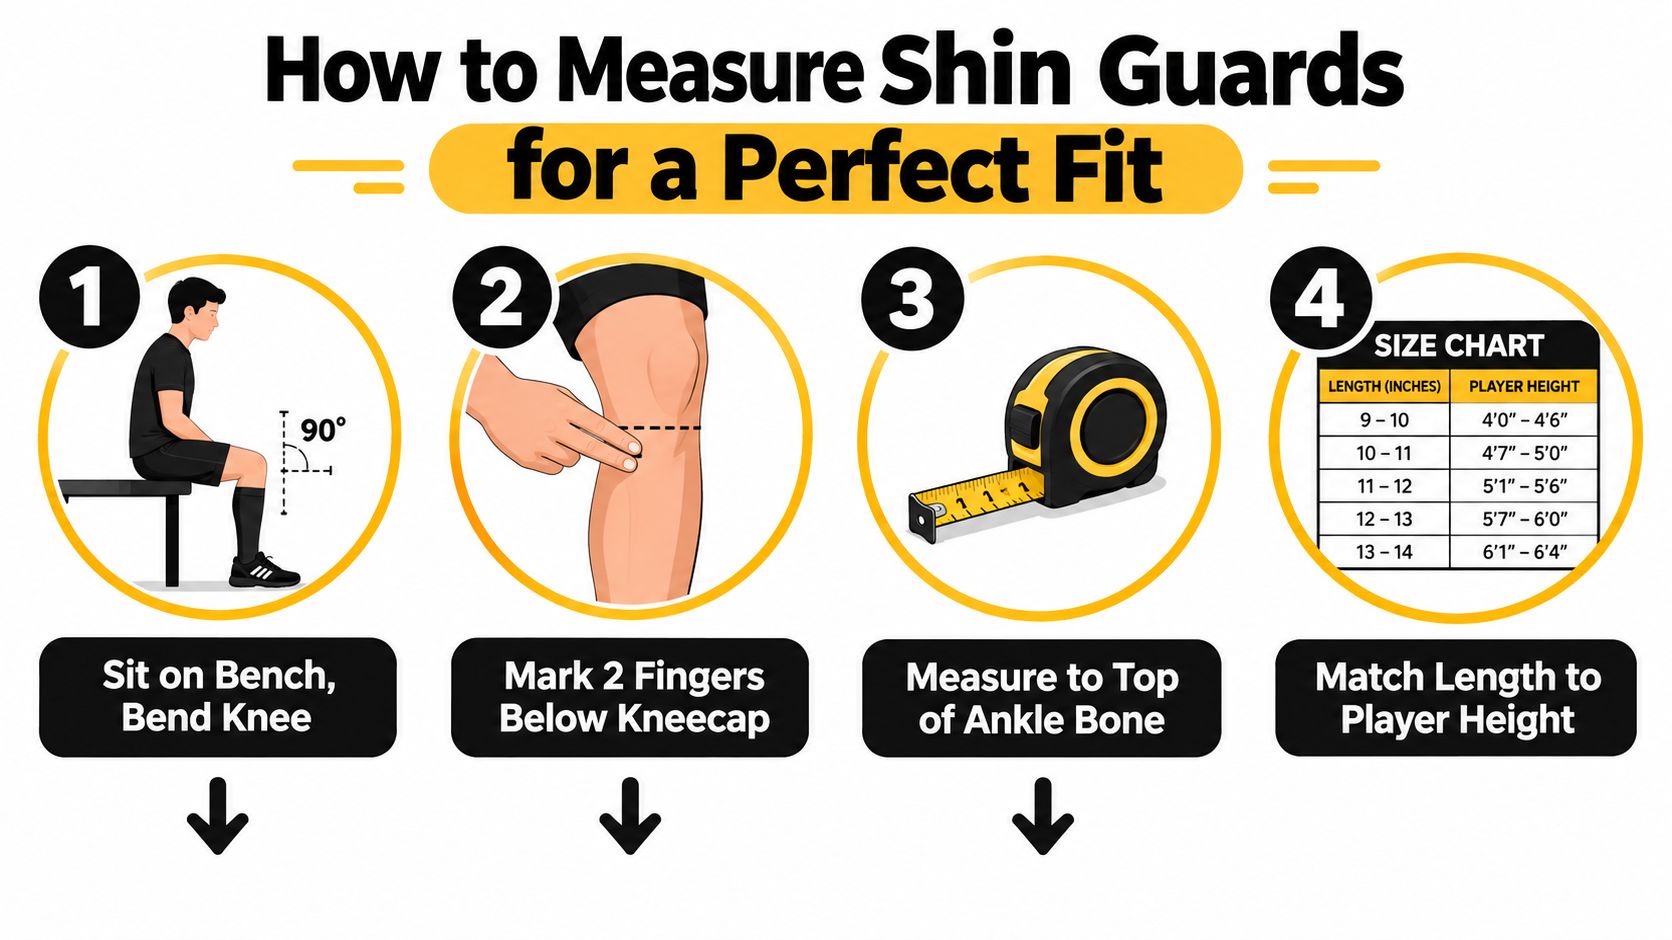
Age is only a rough guide. Two children in the same year group can have noticeably different leg lengths, and a tall child shouldn't automatically be pushed into an adult guard because it seems like a better value. A guard that's too long may press into the knee or boot, while one that's too short leaves the lower or upper shin exposed.
Test the shell against the tibia
Press the guard flat against the front of the relaxed shin. The hard shell should sit over the tibia, not the softer calf muscle, and its shape should follow the natural curve of the leg. The top should sit below the kneecap, while the lower edge should provide useful coverage above the ankle without catching on the boot.
Look for CE marking and relevant safety information. The FA's grassroots guidance recommends CE-marked guards and tells players to favour coverage over micro or mini pads, because non-marked products may increase injury risk. The England Football shin-pad guidance is particularly clear on choosing a guard that covers a good proportion of the shin.
EN 13061:2009 is the UK-relevant European standard used to assess areas including ergonomics, sizing, coverage, restraint and impact performance. A guard ending well above the ankle bone may feel unobtrusive, but it offers less coverage against a low challenge. Hand-me-downs can also fail when they're too narrow, and adult guards chosen so a child can “grow into” them often slide before they provide dependable protection.
Putting Shin Guards On the Right Way
Fit both legs every time, even if the player is strongly one-footed. A stray clearance, tackle or opponent's boot doesn't care which foot the player prefers.
Use this fitting sequence
- Loosen every strap and sleeve. Don't force a guard over a tight sleeve or pull a fastening until the fabric twists. Start with the system relaxed so you can position the shell accurately.
- Slide the guard into place. For a slip-in or ankle-sleeve design, guide it up the inside of the foot and onto the lower leg. The hard shell belongs directly over the front edge of the shin bone, not towards the outside or around the calf.
- Set the height. Place the top edge roughly two finger-widths below the kneecap. It should protect the upper shin without touching the kneecap when the player bends the leg.
- Secure the lower section first. On a strapped or ankle-guard model, fasten the ankle strap or stirrup so the lower edge stays close to the leg. Ankle coverage should cup the malleolus on styles designed to protect that area, without pressing painfully into the bone.
- Fasten the upper section. Tension the calf strap or sleeve until the guard stays stable when the player walks, but don't tighten it so much that it digs in or causes tingling. The guard should feel held, not clamped.
- Flex and move. Ask the player to bend the knee, point the toes, lift the heel and take a few steps. The guard should track the leg instead of riding up, folding or dropping towards the boot.
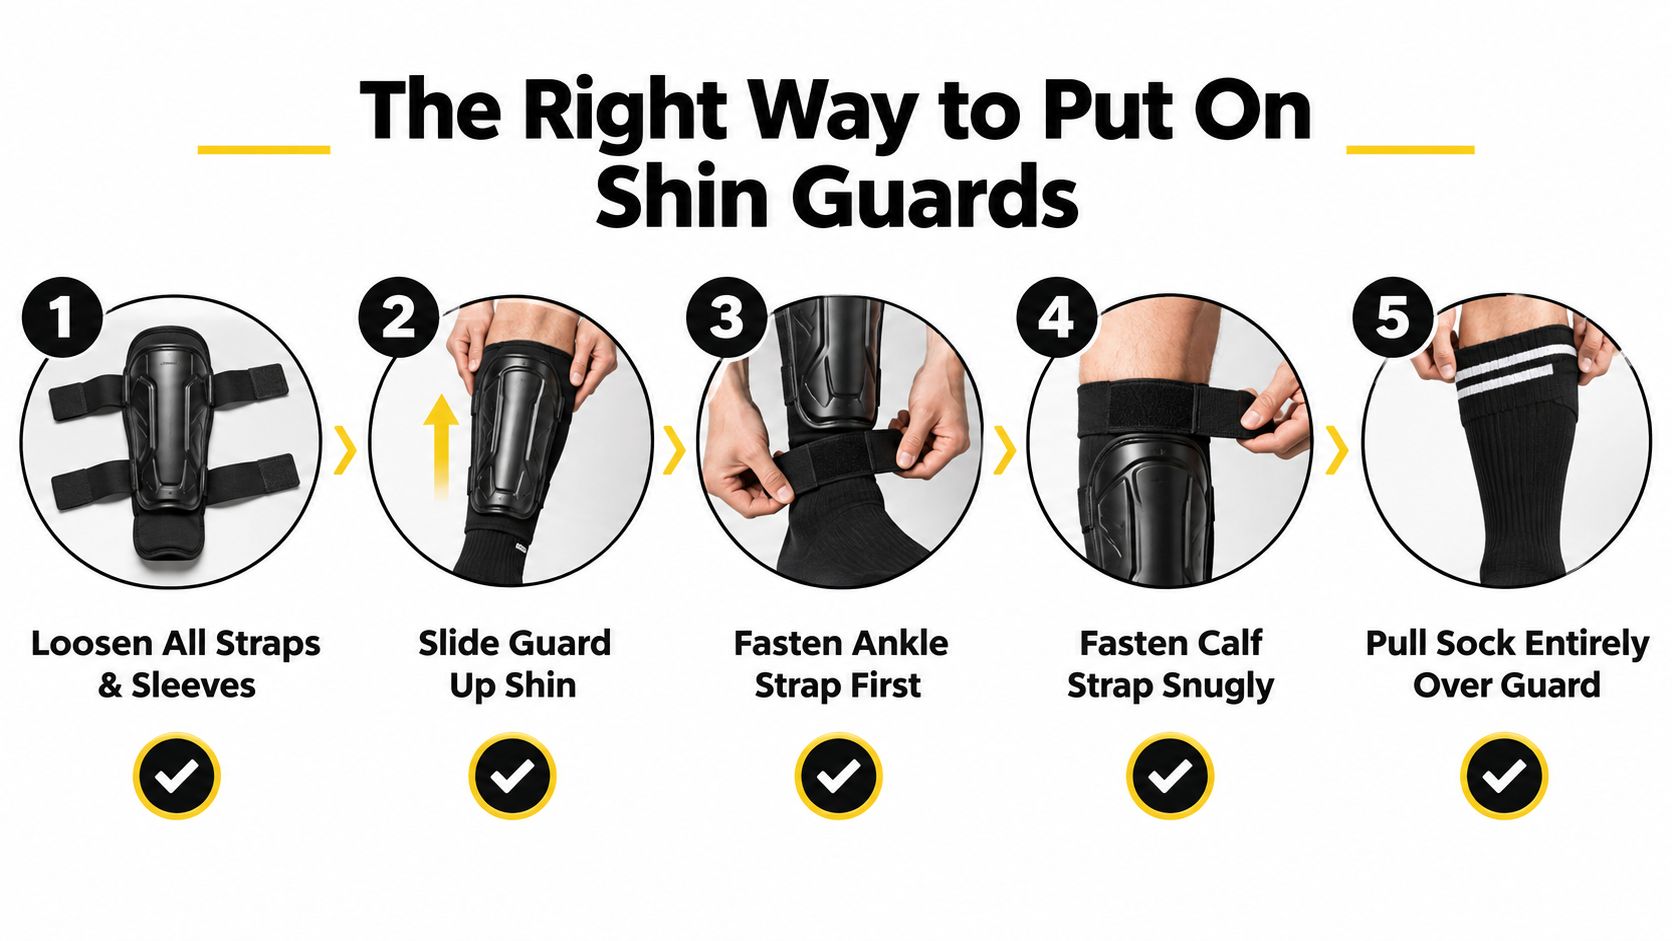
Pull the football sock completely over the guard only after the shell is centred and secure. The sock must cover the guard entirely under Law 4, so visible plastic at the top or bottom needs correcting before the player joins the warm-up.
Finish with a side-on mirror check. The pad should follow the straight line of the shin, the wider end should sit at the top, and the shell shouldn't twist towards the calf. A couple of light jumps and short accelerations will expose a loose fit faster than standing still in the changing room.
Wearing Socks, Sleeves and Straps Together
Treat the sock, sleeve and guard as one system. The guard provides the shell, the sleeve or strap controls movement, and the football sock covers the equipment while adding another layer of grip. If one part is wrong, the other two can't completely compensate.
Start with the guard against the leg, then pull the sock from the toe upwards in sections. Don't drag the sock sharply over one side of the shell, because that can pull the guard off-centre. Work around the calf until the fabric sits evenly and no plastic shows above or below the sock.
Choosing the holding method
| Sock, Sleeve and Strap Combinations Compared | Best For | Hold Level | Ease of Use |
|---|---|---|---|
| Grippy football sock over a slip-in guard | Older youth and adults | Reliable when correctly sized | Simple once fitted |
| Compression sleeve under the sock | Slip-in guards and players who dislike tape | Consistent, but depends on correct sizing | Clean and repeatable |
| Built-in ankle sleeve | Younger players | Strong lower-leg and ankle stability | Straightforward |
| Straps with traditional football socks | Grassroots players wanting visible adjustment | Adjustable and secure when snug | Easy to reset |
| Sock tape over the football sock | Players needing extra hold | Adjustable, but tension must be controlled | More fiddly |
Grippy hold-up socks make sense for players who want a clean setup without repeated taping. Traditional over-the-guard socks can work well too, although some players use a turn-down top or tape to stop the fabric falling. Youth players often benefit from the simplest system they can manage independently, while adults may prefer the low profile of a sleeve and slip-in shell.
Compression sleeves shouldn't feel like a tourniquet. If a youth player reports numbness, tingling, coldness or unusual pressure, remove the sleeve and try a larger size. For a fuller explanation of placement, see this guide on wearing shin guards under or over socks.
Old-school taping still works when applied sensibly. Anchor the tape over the sock below and above the guard, using enough to stop movement rather than wrapping the calf repeatedly. The tape shouldn't crease, pinch the skin or restrict circulation. Pre-taped socks are usually a smarter grassroots option because they reduce last-minute fiddling and give children a more consistent fit.
Common Mistakes and Quick Fixes
Most shin-guard problems show themselves before the whistle. Look at the player walking, bending and pulling the sock up. The visible symptom usually points directly to the correction.
Match the symptom to the fix
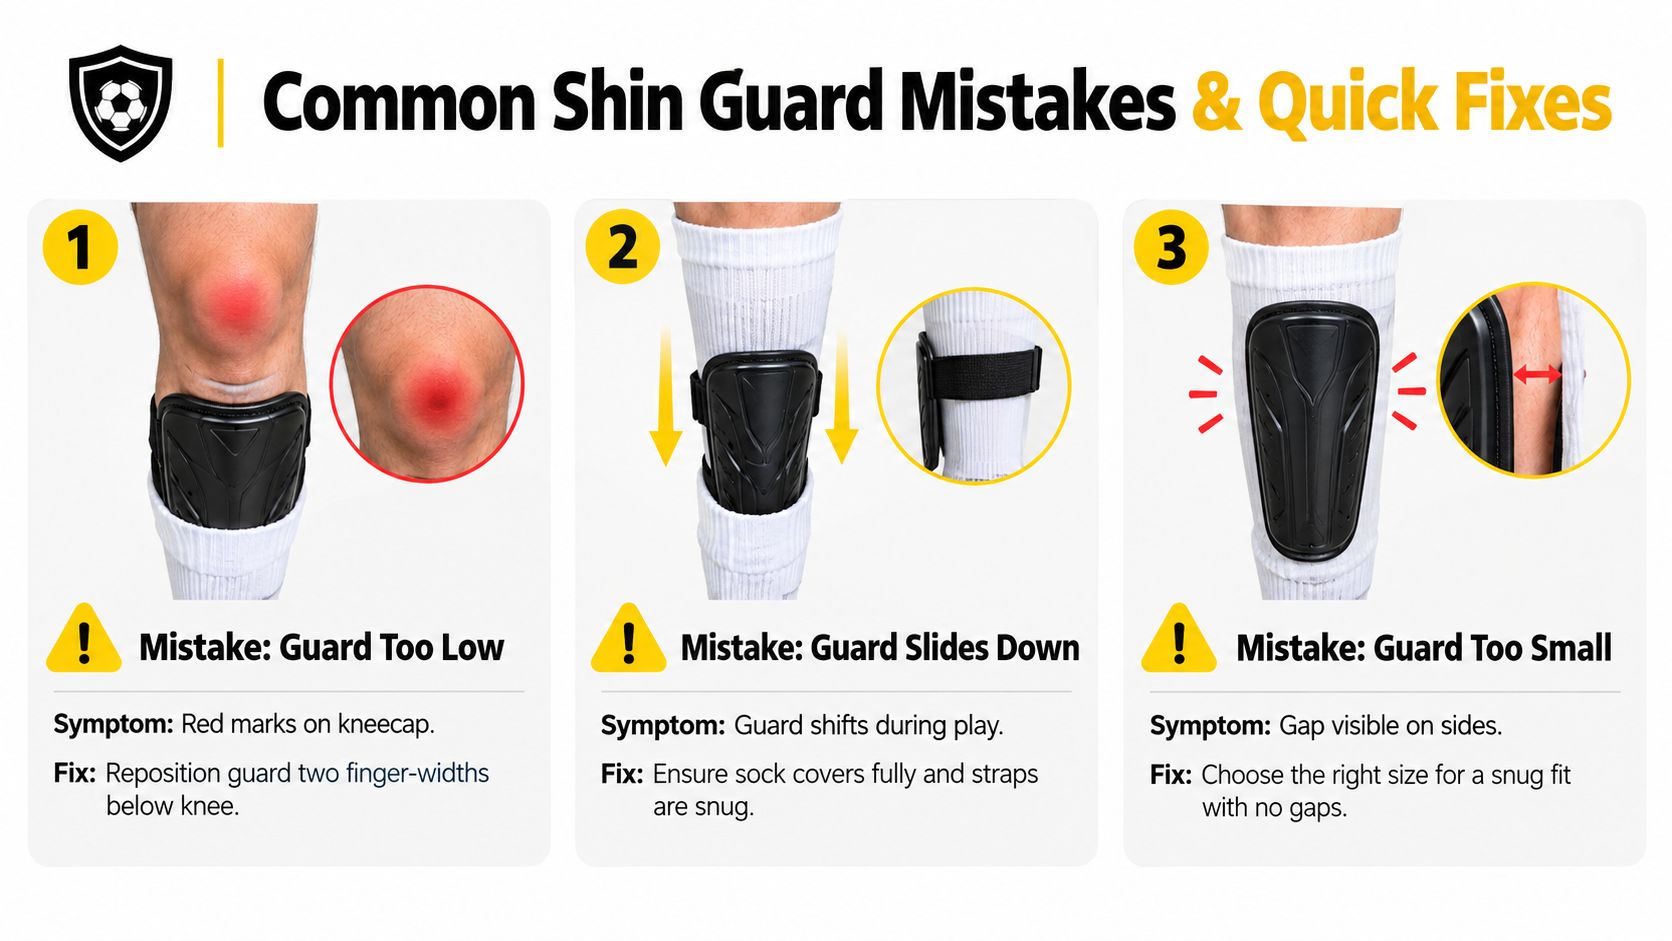
- Guard too low: A red dent across the kneecap after the game often means the guard has been positioned too high or has ridden upwards. Re-centre it so the top sits roughly two finger-widths below the knee, then test knee flexion.
- Guard sliding into the boot: A short sock, loose strap or weak sleeve can let the shell drop and expose the lower shin. Pull the sock fully over the guard, reset the shell, then make the strap snug rather than painfully tight.
- Guard twisted towards the calf: The shell may look present while the tibia is sitting beside it. Use the two-second mirror test from the front and side. If the shell isn't directly over the shin bone, rotate it back and secure the holding layer more evenly.
- Compression sleeve too tight: Numbness, tingling, cold toes or a deep pressure line mean the sleeve is restricting rather than supporting. Remove it and size up, especially for a growing player.
- Guard too narrow: A visible side gap means the shell isn't covering enough of the front of the shin. Replace it with an appropriately sized model rather than trying to force it into position with tighter tape.
- Training-only guard in a match: Check the shell for a CE mark or relevant safety marking before kick-off. The FA recommends CE-marked guards and sufficient shin coverage, while its grassroots guidance warns against relying on micro or mini pads.
Grassroots clubs sometimes set their own minimum expectations because the Laws require shin pads but don't define an exact size. BBC reporting on the IFAB position says football's lawmakers have no current plan to regulate shin-pad dimensions, and the Laws don't specify a required size, as explained in BBC Sport's report on shin-pad regulation. BBC Newsround also reported that some grassroots clubs have banned smaller pads themselves, as covered in its report on grassroots shin-pad rules.
Don't keep using a cracked shell or a guard whose backing has flattened and no longer holds the leg properly. If a knock leaves the calf sore, swollen or painful, stop treating it as a simple kit issue. For general information on fast calf muscle healing, use a suitable health resource and seek clinical advice for significant symptoms.
Pre-Match Checklist and Final Tips
Use this checklist before the player joins the warm-up:
- Knee position: The guard sits below the knee and doesn't press into the kneecap.
- Ankle coverage: The lower leg and ankle area suit the guard's design.
- Tibia centre: The hard shell sits directly over the front of the shin bone.
- Strap tension: Fasteners are snug, not tight enough to dig in.
- Sock coverage: The sock completely covers the guard.
- Sleeve grip: The sleeve holds the shell without causing numbness or tingling.
- Safety marking: The CE mark or relevant safety information is present.
- Shell condition: There are no cracks, sharp edges or serious dents.
- Fastener condition: Velcro and elastic aren't loose or failing.
- Match readiness: Backup tape is in the kit bag and laces are tied before the guards go on.
If a guard slips during a match, the player shouldn't carry on with an exposed shin. Stop at the appropriate opportunity, reset the equipment at the touchline, and ask the referee before re-entering. If the guard has been lost, The FA guidance requires replacement as soon as possible and no later than the next stoppage when the ball is out of play.
At half-time, check for twisting, gaps, damp fabric and loosened straps. A guard that felt secure at kick-off can move after repeated sprints, tackles and sock adjustments. The same kit discipline helps with other training equipment too, whether you're choosing training balls or setting up target nets for finishing practice.
SoccerWares offers football equipment including premium shin guards and training essentials for players and families organising match-day kit. Visit SoccerWares to compare suitable protective gear, then check the fit at home before the next fixture.