

A pass and move football drill is more than just a training exercise; it's about embedding the most crucial habit in football into your players: moving into space the second after you've played the ball. This principle is the absolute bedrock of possession-based football. It’s what fuels teamwork, quick thinking, and constant, intelligent motion on the pitch.
The Foundation of Modern Team Play
At its heart, football is a wonderfully simple game of passing a ball and moving into space. Mastering that simplicity, however, is what separates good teams from great ones. The pass and move philosophy is more than just kicking a ball around; it's the engine that drives team cohesion, creates dominance in possession, and ultimately unlocks stubborn defences. It is the tactical language spoken by successful teams across the globe.
This approach forces every player to think one step ahead. Instead of becoming a spectator after releasing the ball, a player must immediately ask themselves: where’s the best space to receive it back? How can my run drag a defender out of position? It’s this non-stop cycle of pass, move, think, and repeat that creates the fluid, dynamic play we all admire at the highest levels.
Why This Drill Is Essential for Development
A well-executed pass and move drill sharpens several core attributes simultaneously. It is far more than a simple technical warm-up; it builds the footballing brain that defines intelligent players. The benefits are clear and translate directly to better performances on match day.
- Sharpens Spatial Awareness: Players learn to constantly scan the pitch, identifying pockets of space to exploit before they even receive the ball.
- Improves Decision-Making Speed: The tempo of the drill demands quick thinking. Players have to decide where to pass and where to move in a split second.
- Refines First Touch: A crisp first touch is vital for keeping play flowing. This drill provides hundreds of repetitions, ensuring players can control the ball and set up their next action seamlessly.
For example, many grassroots clubs in the UK rely on variations like the "Pass and Move Squares" drill. In this setup, multiple teams occupy adjacent squares, all trying to complete a set number of passes before moving the ball to another square, while defenders apply pressure. It’s a hugely popular exercise designed to improve teamwork and constant movement, just as you'd find in top coaching manuals.
The real objective isn't just to keep the ball, but to move the opposition into areas you want them to be. A pass and move drill teaches your team to control the game's rhythm and dictate play, not just react to it.
Ultimately, mastering these fundamentals creates more effective, intelligent footballers. Teams that can pass and move with instinct are harder to press, better at retaining possession, and far more dangerous in the final third. For any coach looking to build a solid foundation, exploring different coaching drills for soccer is the perfect place to start.
Your Essential Equipment and Pitch Setup
The success of any pass and move drill often comes down to preparation. A slick, organised setup means you waste less time and maximise the time players spend getting the repetitions they need. The good news is you don't need a lorry-load of gear to run a great session. Simplicity is often your best friend.
At its most basic, you just need a reliable football and a few markers. However, if you're working with a full squad and want to keep things flowing smoothly, a small investment in the right kit makes a world of difference.
Your Drill Checklist
Here’s a practical list of what you will need to run a dynamic and organised session:
- A good supply of footballs: To maintain a high tempo, have several fully inflated footballs ready. Nothing kills momentum faster than stopping the drill every time a pass goes astray.
- Durable marker cones: Use cones to clearly mark out your playing area, whether it’s a simple square or a more complex shape. This gives players clear visual cues for their movement.
- Training bibs: Once you start adding defenders or splitting into teams, bibs are non-negotiable. They make it instantly clear who is on which side.
Getting your kit sorted is the first step. For a deeper look into building your coaching toolkit, check out our complete guide to essential football training equipment.
Setting Up the Playing Area
The dimensions of your grid are critical. If the space is too large, the drill becomes slow and unrealistic. If it's too small, it can lead to chaos and frustration. The sweet spot is a challenging environment that genuinely mirrors the tight spaces in a real match.
For younger players, a smaller grid is brilliant for encouraging quicker thinking and sharper first touches. With senior players, you can expand the area to focus more on the speed of movement and the range of passing.
Interestingly, The Football Association (FA) has researched this. For a 7v7 youth game, their analysis found a 40 by 25-yard pitch was ideal for maximising ball touches and movement, which directly improves skills like scanning and quick decision-making. This shows how a simple tweak to the pitch size can replicate proper match intensity. You can find more of the FA's data-driven coaching insights on their official channels.
A great rule of thumb is to start with a 15x15 yard square for a group of four players and then adjust it. If passes look too easy and players have all day on the ball, shrink the area. If they're constantly losing possession and getting frustrated, give them a little more room.
How to Run the Foundational Drill
Let's get down to the practical application. This version of the pass and move football drill is a go-to for youth teams and beginners. It’s brilliant because it strips everything back to the basics: embedding the core principles of passing and moving without the added chaos of defenders. The entire point is to build muscle memory and a genuine understanding of why they need to move after playing the ball.
To set it up, you just need a few cones to mark out a square—something around 15x15 yards is perfect—and one ball for every four players. Place a player on each cone, and you're ready to start. This simple layout is all you need to begin teaching the rhythm and flow that the drill demands.
The image below gives you a clear idea of how simple the setup is. You don't need fancy equipment, just a well-defined space to build good habits.
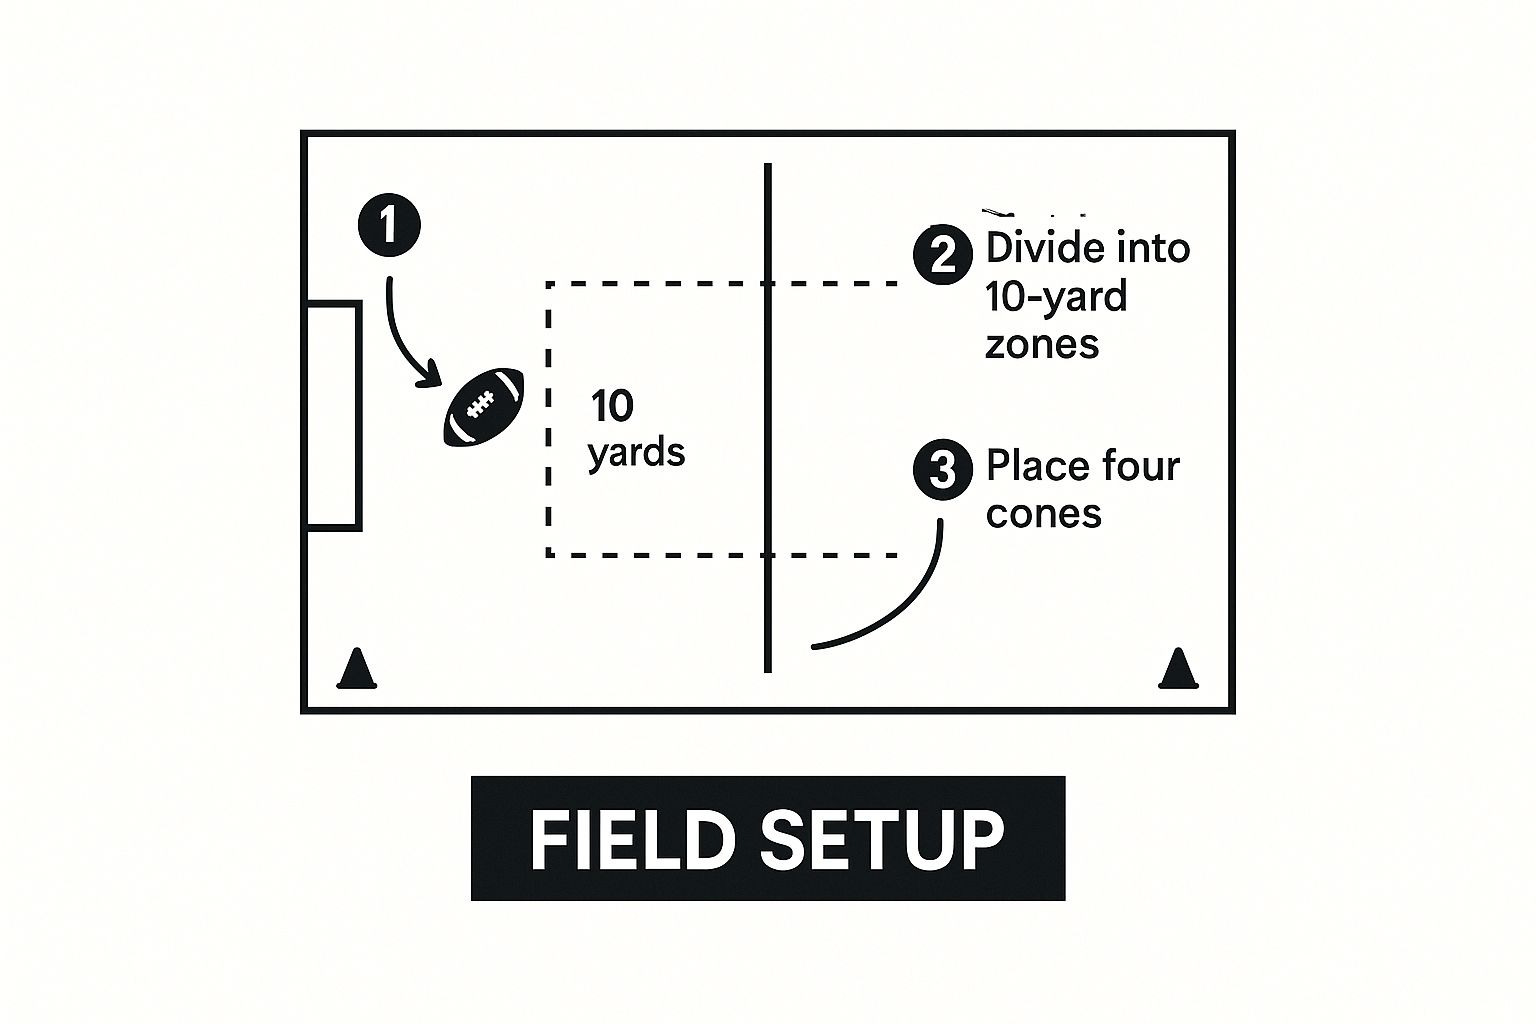
As you can see, it’s about creating a clear, simple practice area where the focus is entirely on the execution of the drill.
Player Roles and Sequence
The beauty of this drill lies in its simplicity. There are no complicated instructions, so every player has a clear, repeatable role. This allows them to concentrate on the quality of their touch and pass. The sequence is designed to be a continuous loop.
Here's a breakdown of what each player should be doing:
- The Passer: Their first job is to play a firm, crisp pass to the next player's feet. Crucially, their work isn't done. The moment that ball leaves their foot, they must move.
- The Receiver: It's all about the first touch. They need to get into the habit of receiving the ball on their back foot. This automatically opens up their body, setting them up perfectly for the next pass.
- The Mover: This is the most critical part. As soon as a player makes a pass, they must sprint to the cone the receiver has just left. This creates a constant clockwise (or anti-clockwise) rotation.
This non-stop rotation is key—it ensures no one is ever standing still. The player who passes the ball is essentially "following their pass" to the next station. It removes any hesitation about where to run and makes the 'move' part of the drill automatic.
The single most common mistake with beginners is "ball watching." They play a great pass and then just stand there admiring it. As a coach, your most repeated phrase will probably be: "Pass and MOVE!" Make the movement a non-negotiable part of the action.
Key Coaching Points to Emphasise
To really extract the value from this drill, your focus as a coach has to be on the small details. Especially with younger players, quality is so much more important than speed. Reinforce these points throughout the session.
- Weight of the Pass: Is it crisp enough to get there quickly? Or is it too powerful, making it difficult for the receiver to control? Find that balance.
- Body Shape: Encourage players to receive the ball "side-on." It gives them a much better view of their surroundings and makes it easier to play their next pass with one touch.
- Scanning: This is a habit that separates good players from great ones. Get them looking over their shoulders before the ball arrives. Build that awareness early.
- Communication: Even a simple shout of a player's name or "yes!" makes a massive difference. Communication is the glue that holds everything together on the pitch.
To make these points stick, this quick-reference table summarises what to look for and what you're trying to achieve with each instruction.
Core Coaching Points for Effective Execution
This table breaks down the critical coaching instructions and the desired player outcomes for the foundational pass and move drill.
| Coaching Point | Focus Area | Desired Outcome |
|---|---|---|
| "Pass and MOVE!" | Post-Pass Action | The player immediately sprints to the next cone, making movement automatic. |
| "Open Body Shape" | Receiving Technique | The player receives the ball side-on, prepared to play the next pass quickly. |
| "Check Your Shoulder" | Awareness | The player develops the habit of scanning the field before receiving the ball. |
| "Crisp Pass" | Passing Technique | The pass is firm, accurate, and easy for the teammate to control. |
| "Talk to Each Other!" | Communication | Players use verbal cues, creating a more connected and efficient team unit. |
Keep circling the square, reinforcing these points one by one. Over time, you’ll see the quality improve, and the drill will start to flow with a real rhythm. That's when you know it's working.
Drill Progressions for Advanced Players
Once your players have mastered the basics of a pass and move drill, the real coaching begins. The aim is to start layering on complexity, forcing them to think faster, move smarter, and execute under the kind of pressure they'll face on match day. This is how you turn a simple exercise into a realistic training scenario.
You don't need to throw them in at the deep end. The first step is to introduce gentle, passive pressure. Place a defender in the middle of the square but instruct them not to tackle. Their only job is to shadow the ball and block passing lanes. It’s a simple change, but it immediately forces the attacking players to think more creatively about their angles and movement.
Introducing Active Pressure
After a few minutes, it’s time to raise the stakes. Making the defender 'live' changes the entire dynamic. The intensity shoots up, and players suddenly have to protect the ball, make split-second decisions, and communicate far more.
Here are a couple of ways to introduce active pressure:
- One Defender: Start with one defender in the middle of a 4v1. This is your classic 'Rondo' or piggy-in-the-middle. The goal for the attackers is simple: keep the ball.
- Two Defenders: Up the ante with a 4v2. This really tests their composure in tight spaces and demands even sharper passing and more urgent off-the-ball runs.
A key coaching tip: always reward the defenders. If they win the ball, they swap out with the player who lost it. This competitive twist keeps everyone switched on and working at 100%.
You can also increase the difficulty by adding conditions, like limiting players to one or two touches. This forces them to think ahead, scan for options before the ball arrives, and perfect their first touch. It’s a fantastic way to develop the quick, incisive passing needed to unlock a compact defence. If you're looking for more ways to build these fundamentals, our guide on football drills for beginners offers a solid foundation.
Adding Tactical Complexity
Once your players are comfortable playing under pressure, you can start weaving in more advanced tactical ideas. One of the best is the 'third-man run'. This is where one player passes to a teammate, and a third player makes a forward run to receive the next pass.
This concept is vital for breaking defensive lines and creating overloads in a real game. You can encourage it in the drill by coaching players to look for the quick one-two or the pass around the corner to an advancing teammate.
Another brilliant progression is to evolve the drill into a competitive small-sided game. This is where it all comes together—passing, moving, defending, and finishing. A great example is a 3v3 game with keepers, which is common in UK academy sessions. To encourage good habits, you can set a rule where teams must complete a set number of passes before they’re allowed to shoot. It’s an incredible way to teach tactical intelligence alongside technical skill.
By gradually adding these layers, you keep the drill fresh, challenging, and directly linked to what happens on a Saturday afternoon. It ensures your advanced players are always being pushed to the next level.
Common Mistakes and How to Fix Them
Even the best-planned pass and move football drill can fall apart if small errors are allowed to slide. Your job as a coach isn't just setting up cones; it’s about being a sharp-eyed problem-solver, spotting bad habits before they take root. Recognising these common mistakes is the first step to making your training sessions truly effective.
The biggest issue is players becoming static spectators the second the ball leaves their foot. They play a pass and simply stand still. This habit completely kills the drill's purpose and is a one-way ticket to being punished in a real match.
Another classic problem is "ball watching." Players get so fixated on the ball they forget to scan for space, teammates, or danger. This tunnel vision destroys their awareness. Finally, the pass quality itself can break down—either hit with the wrong weight, making it difficult to control, or played straight to a teammate's feet instead of into the space they're moving into.
Fixing Static Movement
Getting players to move after a pass has to be a non-negotiable rule. Hesitation is the enemy. You need to make it crystal clear where they should go immediately after releasing the ball.
- Rule of the Cone: A simple but effective fix. Instruct every player that they must sprint to the cone their teammate has just left. It creates an obvious destination and makes the movement automatic rather than an afterthought.
- The Two-Cone Rule: To add more dynamism, place a second cone a few yards away from each station. After passing, the player has to sprint around that second cone before returning to their spot.
These small adjustments force that explosive burst of acceleration right after the pass, building the exact kind of match fitness players need.
Improving Awareness and Scanning
To stop players from just staring at the ball, you have to force them to look up and see what’s going on around them. Building the habit of scanning is critical for developing intelligent footballers who anticipate play instead of just reacting to it.
One of the best coaching cues is to randomly ask a player, "What colour bib is behind you?" right before they receive a pass. It sounds simple, but it forces them to check their shoulder and builds the mental trigger to constantly gather information.
Another great technique is to use different coloured cones or bibs at each station. Before the drill starts, shout out a colour. The player about to receive the ball has to call out where that colour is on the pitch. This simple verbal task turns a basic passing drill into a full-blown awareness session, encouraging active looking and improving their peripheral vision.
Got Questions? We’ve Got Answers
Coaches and players often have questions when they're trying to perfect a new drill. Here are some of the most common queries we receive about the pass and move football drill.
How Often Should My Team Practise This Drill?
Ideally, every single session. It’s that fundamental.
You could run a simple version for 10-15 minutes as part of your warm-up. It's an excellent way to get players’ minds switched on and their bodies ready for the session ahead.
Alternatively, you can make it the core technical part of your training, spending 20-25 minutes on it with progressions and challenges included. The key is consistency. Regular practice is what turns a clunky, conscious action into a smooth, instinctive habit that players will automatically use on match day.
What’s the Best Number of Players for This?
One of the best things about this drill is its adaptability. You can get a basic setup working perfectly with just three players in a triangle, allowing them to focus on the pure mechanics of a good pass and a sharp movement.
For more game-like situations, groups of four to eight players are ideal. This opens up options for drills like a 'Rondo' or a possession box. If you’re building it into a small-sided game, just split your squad into teams of four or five.
The key is to adjust the size of the playing area to match the number of players. You want to keep the tempo high and ensure everyone gets plenty of touches.
A good coach is always tweaking the variables. If the drill looks too easy, shrink the space or add a defender. If your players are struggling, make the area bigger to give them more time on the ball. The perfect setup is one that challenges players without discouraging them.
How Can I Adapt This for Very Young Players?
When you're coaching young children, such as an Under-8s team, your focus needs to be on two things: fun and the absolute basics. Strip the drill right back.
Forget about defenders or complicated rules for now. The goal is simple: pass the ball, then run to a different cone. That’s it.
Use clear, direct instructions and provide plenty of positive reinforcement. Your mission is to embed two core ideas: play a simple pass to a teammate's feet, and immediately move into a new space. A great trick is to turn it into a game, like "don't get caught standing still." It’s a fantastic way to keep them engaged and learning without them even realising it.
At SoccerWares, we know that having the right equipment is just as important as having the right drills. A solid foundation is everything. From durable training cones to all-weather footballs that provide a consistent touch, we have everything you need to run the perfect pass and move session. Explore our full range of training essentials at https://soccerwares.com.